How to remove a tick safely: A clinically informed step-by-step guide
Assess the tick and prepare the area
A tick crawling on the skin but not attached can be brushed away or lifted with tweezers, and disease transmission does not occur from an unattached tick. An attached tick should be removed using a clean pair of fine-tipped tweezers or a purpose-built tick-removal tool. The tool should allow the tick to be grasped close to the skin rather than squeezed around its swollen body. 1
Before removal, wash the bite area gently with soap and water without scrubbing. Cleaning first helps reduce the chance of a secondary bacterial infection through the small opening created when the tick attaches. A few minutes spent preparing the tools and lighting can improve control, particularly when the tick is very small or located near hair. 9
Grip the tick close to the skin
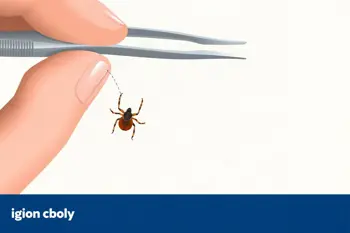
Position fine-tipped tweezers around the tick's mouthparts, as close to the skin's surface as possible. Avoid gripping the abdomen because pressure on the body can crush the tick and make removal more difficult. The objective is a controlled grasp at the point where the tick enters the skin, not a squeeze across the visible portion of the parasite. 1
Once the tweezers are positioned, keep them steady and pull upward with slow, even pressure. Do not twist, jerk, or make a sideways movement. Steady upward traction reduces the likelihood that the mouthparts will break away and remain embedded. The American Academy of Pediatrics and tick-removal guidance both identify direct upward pressure as the safest basic technique. 37
Clean the bite and dispose of the tick
After the tick comes out, clean the bite site and hands with soap and water, rubbing alcohol, hand sanitizer, or an iodine scrub. Cleaning is an important part of aftercare because the bite creates an opening in the skin. Mild local irritation can occur, but increasing redness, swelling, or drainage should be recorded and discussed with a healthcare professional if it persists. 5
A removed tick can be placed in alcohol, sealed in a small bag or container, wrapped tightly in tape, or flushed down a toilet. It should not be crushed with bare fingers. A photograph may help with later identification, although routine tick testing is not always necessary. Handling the tick with a barrier prevents additional skin contact after removal. 48
Methods to avoid during removal
Petroleum jelly, nail polish, heat, and a burning match are not recommended ways to remove an attached tick. These approaches can irritate or agitate the tick, prolong attachment, make the parasite harder to grasp, or create a separate risk of skin burns. They also do not replace the mechanical removal method supported by public health and clinical guidance. 2
Forceful twisting, crushing, and repeated pulling should also be avoided. The longer a tick remains attached, the greater the potential exposure to pathogens carried by an infected tick, although a bite does not automatically mean that disease transmission occurred. Not every tick carries Lyme disease, and disease risk varies according to the tick species, location, and duration of attachment. 79
What to do if mouthparts remain
Small mouthparts can occasionally remain in the skin if the tick is pulled apart during removal. If they are superficial and cannot be easily lifted with clean tweezers, digging into the skin is not advised. The remaining material can often be left alone while the skin heals and naturally sheds it. Further manipulation can cause unnecessary trauma or introduce bacteria. 6
Medical advice is appropriate when the tick cannot be removed, when mouthparts are deeply embedded, or when the bite site develops concerning inflammation. A healthcare professional can assess whether material should be removed and can consider the tick species, geographic setting, attachment duration, and the person's medical circumstances. Children, pregnant people, and individuals with immune problems may need individualized guidance. 56
Monitor symptoms and reduce future exposure
Monitor the bite area and general health for several weeks after removal. Warning signs can include an expanding rash, a bull's-eye pattern, fever, fatigue, muscle aches, joint pain, headache, or other flu-like symptoms. A rash is not required for every tick-borne illness, so new unexplained symptoms after a bite should be reported to a healthcare professional with the date and location of exposure. 89
Prevention depends on reducing exposed skin and checking for ticks after outdoor activity. Long pants and long sleeves can be worn, pants can be tucked into socks, and clothing or skin repellents should be used according to their labels. Showering and inspecting the scalp, hairline, nape, underarms, groin, belly button, and backs of the knees can identify attached ticks that might otherwise go unnoticed. 19
Sources
- Centers for Disease Control and Prevention
- Mayo Clinic
- HealthyChildren.org, American Academy of Pediatrics
- U.S. Environmental Protection Agency
- WebMD
- Columbia University Irving Medical Center
- University of Rhode Island TickEncounter Resource Center
- Healthline
- Cleveland Clinic
Authored by MyTrendSpot team